
If you want to record your screen with your iPhone, you can usually do this quickly via the Control Center. With the iOS 17 version, the whole process is even easier. But there are also alternative ways.
Record your iPhone screen with iOS 17: Here’s how
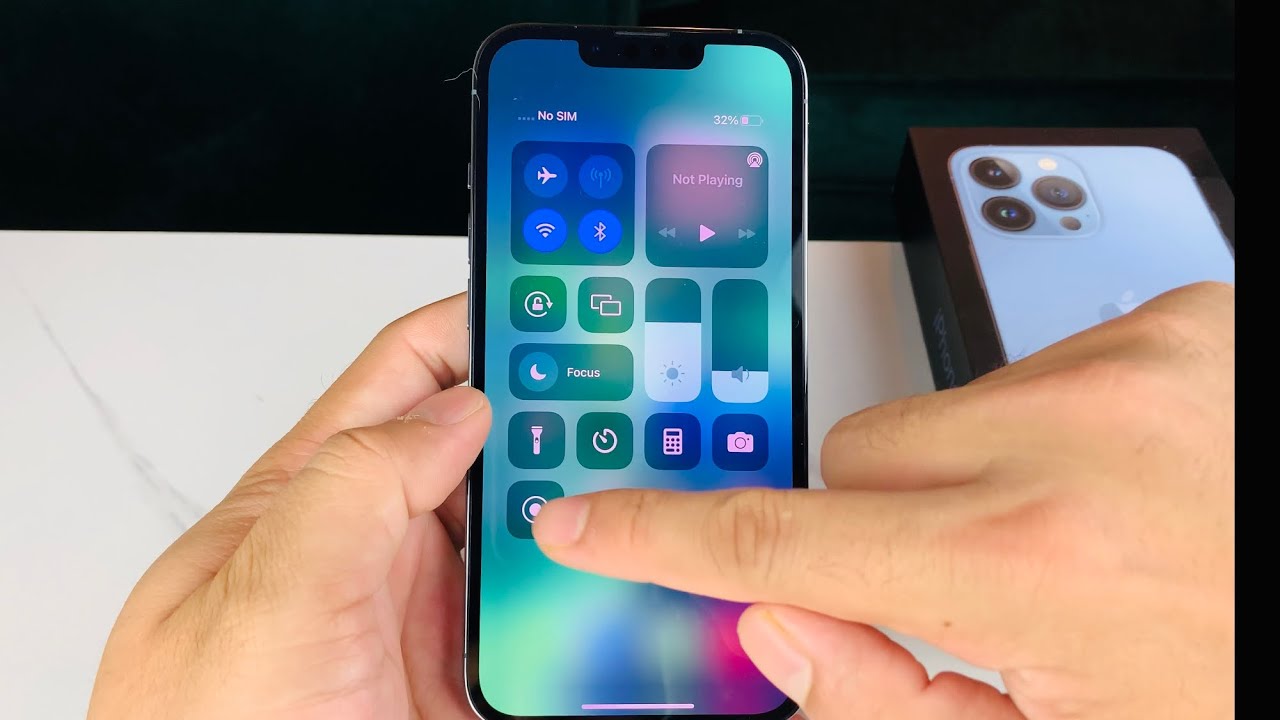
Whether you want to create a tutorial, record a game, or simply capture something, your iPhone’s screen recording feature is a handy tool. It’s usually already integrated into the Control Center, where you can quickly access important features by swiping down from the top right corner of the screen on Face ID devices. If the record button is not displayed there, proceed as follows:
- Open the settings on your iPhone. Tap on “Control Center” and scroll down to “More Controls.” Tap the green plus icon next to “Screen Recording” to add it.
- Now when you swipe down the Control Center, you can conveniently start and stop recording using the corresponding button. All recordings are saved in the Video folder.
- Once the feature is available in the Control Center, start recording: Open the Control Center and tap the record icon. This is a filled circle inside a ring. This also stops the recording. During recording, iOS displays a red bar at the top or around the Dynamic Island – it is red when the microphone is active and green when it is not. This way, you always know when recording is in progress.
- If you want to record sound via the microphone during recording, for example because you are recording a tutorial, press and hold the recording icon. You can activate the microphone in the menu that appears. This will record not only the device sound, but also your voice.
- Good to know: For copyright reasons, some apps such as Netflix, Amazon Prime Video, or Apple TV completely block screen recording or only show you a black screen. This is intentional and cannot be circumvented.
Edit screen recording on iPhone
iOS 17 makes it particularly easy to edit recordings directly.
- After you have finished recording, a message appears at the top indicating that the recording has been saved to Photos. Open the Photos app and tap on the video.
- There you can trim it using “Edit” to adjust the start and end points or add markings with Markup.
Alternative methods for screen recording on iPhone
If you connect your iPhone to a Mac via cable, you can also start a screen recording using QuickTime Player. This method is particularly useful if you want to edit the recording directly on your Mac or insert it into other programs.
- To do this, open QuickTime Player and select “File ☻ New Movie Recording.” Click the small arrow next to the record button and select your iPhone as the camera source.
- For special requirements, such as displaying annotations in real time or needing higher recording quality, you can use apps such as TechSmith Capture, Record It! or ScreenFlow (for Mac).
- Always pay attention to the privacy policy of the respective app when using it.
iPhone vs. iPad: Differences in operation
Although both the iPhone and iPad have a screen recording feature, there are some subtle but important differences in how they work that you should be aware of:
- Access to the Control Center may vary. On iPhones with Face ID and iPads without a Home button, swipe down from the top right corner of the screen to open the Control Center. On iPhones with a Home button, swipe up from the bottom of the screen. On older iPads with a Home button, you can also access the Control Center by swiping up from the bottom.
- The format and display of the recording also differ: The iPad usually has a different aspect ratio (4:3 instead of 19.5:9 on the iPhone). The screen recording is therefore saved in a different format.
- If you use Split View or Stage Manager, which is only available on supported iPads running iPadOS 16 or later, the screen recording will only capture the visible area. Other apps in the background or on the side will not be recorded.
- The display elements during recording are also different. On the iPhone, a red or green indicator appears at the top or in the Dynamic Island during recording. On the iPad, the indicator usually appears in the status bar at the top, depending on the model used.
- The iPad has a special input option: The iPad’s larger display is better suited for precise input with the Apple Pencil if, for example, you want to work with markings or handwritten comments during recording. This feature is not available on the iPhone in this form, as the Apple Pencil is not supported.
- There are also differences in storage and performance: iPads often have larger storage capacities and more RAM, which is beneficial for longer recordings or parallel multitasking. Older iPhones are more prone to memory bottlenecks or performance losses during long screen recordings. Therefore, check the available storage space in advance.